Carrot Cupcakes with Cream Cheese Icing

Last weekend, I hosted a 50th birthday party for a close friend. Before the party, I asked her if she had any special requests (the party wasn't a surprise, which made it much less stressful for me). Her only request was  cupcakes for dessert. Great! I love making cupcakes.

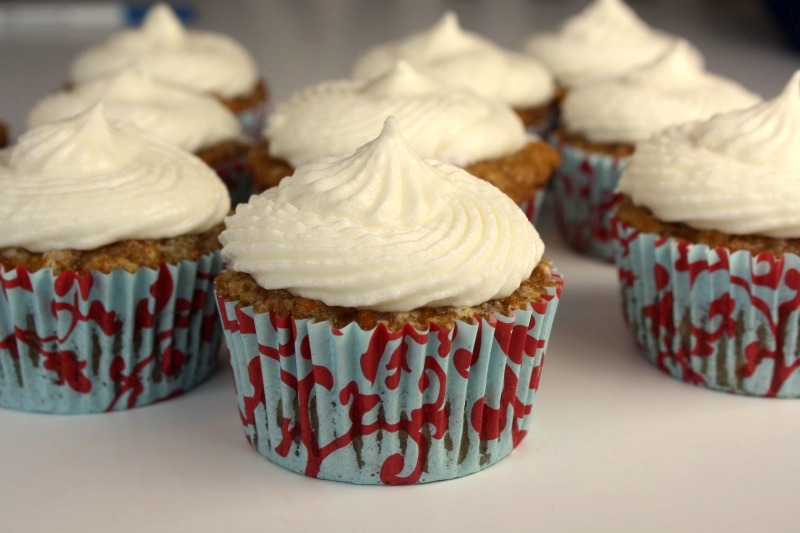
I served three flavors, which I'll cover in three different blog posts. First up: Carrot Cupcakes with Cream Cheese Frosting. I originally found the recipe on a food blog, but then I spotted the same cupcake recipe in a past issue of Cooks Illustrated. I was missing one of the spices called for in the recipe, so I substituted pumpkin pie spice -- it contained all of the spices listed in the recipe.

In the end, the cupcakes were good but nothing I'd swoon over. My guess is that Cooks Illustrated was going for a recipe that focused on the carrots, but I'd prefer more going on -- more spices and maybe some coconut and/or walnuts. The cream cheese frosting was my tried and true.

Some details: I frosted the cupcakes using a Wilton 6B decorating tip and a large coupler. I got the cute cupcake liners from this online Esty shop. The liners were said to be greaseproof, but maybe 1 1/2 cups of oil was too much for even greaseproof liners.

Next up will be the cupcakes that were the real hit of the party!

Carrot Cake Cupcakes with Cream Cheese Frosting
Makes 24 cupcakes

2 1/2 cups all-purpose flour
1 1/4 teaspoons baking powder
1 teaspoon baking soda
1 teaspoon cinnamon
1 1/2 teaspoons pumpkin pie spice (I'd use more spice next time)
1/2 teaspoon salt
1 lb. (6-7 medium) carrots, peeled
1 1/2 cups granulated sugar
1/2 cup packed light brown sugar
4 large eggs
1 1/2 cups canola, safflower or vegetable oil
(I'd also add coconut and/or chopped walnuts next time.)

Preheat oven to 350 degrees F. Line muffin pans with 24 baking cup liners.

In a medium bowl, whisk together the flour, baking powder, baking soda, spices and salt; set aside.
In a food processor fitted with a shredding disk, shred the carrots. Dump the carrots on top of the bowl with the dry ingredients and set aside. Wipe out the bowl of the food processor and fit with the metal blade.

Process the sugars and eggs until frothy and combined, about 20 seconds. With the machine running, add the oil in a steady stream through the feed tube. Continue to process until the mixture is light in color and combined, about 20 more seconds. Transfer the mixture to a large mixing bowl and stir in the carrots and dry ingredients until incorporated and no streaks of flour remain.

Divide the batter evenly among muffin pan cups. Bake 20 to 24 minutes or until toothpick inserted into center of cupcakes comes out clean. Cool cupcakes in muffin pan on wire rack for 5 minutes. Carefully lift each cupcake from muffin pan and set on wire rack. Cool to room temperature. Frost with cream cheese frosting, below.

Cream Cheese Frosting
Frosts about 24 cupcakes

1 8-ounce package of regular cream cheese, cold
1/2 cup (1 stick) butter, softened
1 teaspoon vanilla
2 cups (250 grams) powdered sugar

Blend together cream cheese and butter. With mixer on low speed, add the vanilla. Gradually add the powdered sugar until completely incorporated.

Cupcakes from Sugar Mountain Bake Shoppe

I had two wishes for Mother's Day: a new garage door opener (I'm nothing if not practical) and to try the cupcakes at Sugar Mountain Bake Shoppe. So on the Saturday before Mother's Day, while my husband and 16-year-old son worked on the garage door, my younger son and I headed to the trendy Park Avenue area to pick out cupcakes.


Oh, the place was charming! The building houses two businesses -- a Victorian tea room during the day, and then it turns into Sugar Mountain Bake Shoppe at 5 p.m. It's unusual for a bakery to open at 5 p.m., but I can see why it could work in the Park Avenue area, which is home to lots of young adults. I'll bet they pick up cupcakes on their way home from work, or stop in for coffee and cupcakes with friends. (They also serve food but I didn't pay much attention to the menu.)


The building has small rooms. Some are decorated in a Victorian style and some have a more current look. There's also a cute front porch -- I'd love to go there with friends.

They bake a lot of different flavors -- their website says 85 -- and different ones are on display each day. Or, you can order a dozen or more of your favorites with 24 hours notice. Each flavor was frosted differently and every one was gorgeous. It was tough to decide which eight to choose (we picked two for each of us -- one for Saturday and one for Sunday). Here's what we eventually selected:

Devil’s Twist : Dark chocolate cake with a white cream filling, dipped in chocolate ganache -- it looked like a Hostess cupcake.
Cookies and Cream: Dark chocolate cake with a chocolate cookie crust filled with white cream, topped with white chocolate buttercream and chunks of crushed chocolate cookies. My 13-year-old son devoured it the moment we got home on Saturday. I barely had time to snap this picture..
Cappuccino: Chocolate espresso cake filled with mocha ganache, topped with coffee buttercream. My 16-year-old son gave it a thumbs-up.
White Russian: Vanilla cake baked with kahlua and vodka, filled with kahlua chocolate ganache, topped with mocha buttercream. This was my favorite -- my husband's, too.
Chocolate Peanut Butter: Dark chocolate cake with peanut butter cream filling, topped with peanut butter buttercream. I thought the peanut butter filling and frosting obliterated the flavor of the chocolate cake.


What I didn't love:
- The cakes. They were light and a bit crumbly. My personal preference is a denser, moist cake. And I felt that the chocolate flavors could have had a more pronounced chocolate flavor.
- If I'm really being nitpicky, the cakes had "muffin tops." While I like them on muffins, I thought they made the cupcakes a little awkward to eat. But that's truly nitpicking.

What I loved: 
- The way they looked. You eat with your eyes first, and these were artfully done.

- All of the fillings and frostings. They were light and fluffy, not as sweet and heavy as typical bakery buttercreams.

Sugar Mountain Bake Shoppe set a benchmark for my upcoming cupcake baking projects -- I'm going to give more thought to how I decorate various flavors. I'll also be sure to go back with a friend and enjoy a cupcake on their porch in the summer.

Sugar Mountain Bake Shoppe on Urbanspoon

Banana Whoopie Pies with Cream Cheese Frosting


I had to make a dessert for a church pot luck dinner, and as usual I had a few verging-on-overripe bananas on the counter. What to make with those bananas? I was banana cupcaked out, and banana bread wasn't desserty enough, so I searched the Web for some ideas. The recipes that caught my eye: Banana Whoopie Pies.

Mmmm ... they sounded so good. But Banana Whoopie Pies for a church function? Wouldn't that sound a little risque?

I had never made whoopie pies before, or even tasted them, but they sounded so good that I decided to risk it.

Ohhh ... they turned out sooo good. Two cakey cookies that tasted like banana bread, sandwiched together with a generous dollop of fluffy, sweet, tangy cream cheese frosting. At the church dinner, I heard no complaints. Just a few "mmm's" and "oohs." I'll be making whoopie pies again for sure.

Banana Whoopie Pies with Cream Cheese Frosting
Cookies adapted from Taste of Home; filling from Martha Stewart

1/2 cup (1 stick) butter, softened
1/2 cup sugar
1/2 cup packed brown sugar
1 egg
1 teaspoon vanilla extract
1/2 cup mashed ripe banana (1 large or 1 1/2 medium bananas)
1/2 cup buttermilk
2 cups (280 grams) all-purpose flour
1/2 teaspoon salt
1/2 teaspoon baking powder
1/2 teaspoon baking soda

Filling (from a Martha Stewart recipe -- you'll have some left over):
3 cups confectioners' sugar
1/2 cup (1 stick) unsalted butter, softened
8 ounces cream cheese, softened
1 teaspoon pure vanilla extract
Pinch of salt

In a large bowl, cream butter and sugars until light and fluffy. Beat in egg and vanilla. In a small bowl, combine banana and buttermilk. In a third bowl, combine the flour, salt, baking powder and baking soda; gradually add to creamed mixture alternately with banana mixture.

Drop by tablespoonfuls two inches apart onto parchment paper-lined baking sheets. (At this size, you will make about 50 cookies.) Bake at 350° for 12-15 minutes or until set. Cool for 2 minutes before removing from pans to wire racks to cool completely.

For filling, in a large bowl, beat the cream cheese, and butter until fluffy. Beat in confectioners’ sugar, vanilla and salt until smooth. Use a pastry bag with a large star top to pipe a generous dollop of filling on the bottoms of half of the cookies. Top with remaining cookies and press together gently. Refrigerate for at least an hour before serving; store in the refrigerator.

Makes about 25 cookie sandwiches.

Orange Kissed Cheesecake Cupcakes with Strawberries

My thoughtful mother-in-law is always telling me not to "fuss" when I'm planning a family gathering. Since I enjoy what she terms "fussing" -- making a nice meal and dessert -- I often don't heed her advice. But last week, when we celebrated her birthday, my hectic schedule made me give in. We called out for pizza and wings ... but I did manage to make a reasonably nice dessert. Since she likes cheesecake, I made these cheesecake cupcakes, which I adapted from a recipe from Family Circle magazine. I was happy with the way they turned otu -- they had a subtle orange flavor and were just a tad firmer than I usually prefer for cheesecake.

The little cheesecakes form a dome on top as they bake, just like regular cake cupcakes, and then sink down as they cool. Don't make the mistake I did, and put too many graham cracker crumbs in the bottom of the cupcake liner. When I went to add the topping, there just wasn't room for it, so a fair amount of it spilled onto the outside of the cupcake liners. (That's why my photos show the opened cupcakes.) If you like a thicker crust, or just want to make sure your cupcakes look tidy, you may want to make a 13th cupcake or a few mini cupcakes. (Note: a friend made these after my original post. She made a few more than 12 and found them to be too small. Don't make this into more than 13 cupcakes. She used raspberry jam and raspberries and liked the flavor.)

My mother-in-law enjoyed the cupcakes, and also mentioned that she appreciated the portion control (as did I). They'd also be a good dessert to have for Easter. Speaking of which ... I won't be posting again until after Easter, so I'd like to wish my friends, family and readers who celebrate Easter a joyful day!

Orange-Kissed Cheesecake Cupcakes with Strawberries
Rah Cha Chow recipe

12 graham cracker squares, crushed
8 ounces cream cheese, softened
1 cup sugar
2 eggs
1/2 cup sour cream
2 tablespoons orange juice
1 teaspoon orange zest
1/2 teaspoon vanilla extract
1/4 cup all-purpose flour
Pinch of salt
Foil cupcake liners

Topping/garnish:
1/2 cup sour cream
2 tablespoons strawberry jam (could use raspberry instead)
12 large strawberries, for garnish (could use raspberry instead)

Heat oven to 325 degrees. Line 12-13 muffin pan cups (or 12 muffin cups and a few minis) with foil cupcake liners. (Yes, you really need them to be foil -- but there are some cute and colorful foil liners out there.) Place 1 scant tablespoon of graham cracker crumbs in each -- just enough to coat the bottom.

Beat cream cheese and sugar until smooth. Add eggs and beat until blended. (Be sure to keep scraping the bowl throughout the mixing process to keep the mixture smooth.) Beat in sour cream, juice, zest and vanilla. On low speed, beat in flour and salt.

Spoon about 1/4 cup batter in each cup (I use an ice cream scoop). Bake at 325 for 35 minutes.

While the cupcakes are baking, stir together the sour cream and jam. After 25 minutes, spread about 2 teaspoons of the sour cream mixture on top of each cupcake and bake for an additional 5 minutes.

Remove from oven and cool in pan on wire rack for 30 minutes. Remove cupcakes to rack to cool completely.

Slice strawberries without cutting all the way through the stem end (see picture). Fan out strawberries and place on top of cupcakes.

Roasted Garlic Bread


This bread, which I served with lasagna for my son's 16th birthday, is absolutely divine. As usual with Paula Deen's recipes, it had an obscene amount of butter, which I cut back by a fourth, and it was still decadent and delicious. It's definitely a repeater recipe, but to avoid a heart attack it's for special occasions only!

Roasted Garlic Bread
Adapted from this Paula Deen recipe

1 head garlic, unpeeled
1 tablespoon olive oil
1 1/2 sticks butter, softened

1/2 teaspoon ground black pepper
1/2 teaspoon salt
1 loaf Italian bread, split horizontally

Preheat oven to 425 degrees F. (If you have a toaster oven and aren't cooking anything else at the same time, use that.)

Cut top off garlic head. Place garlic on a piece of aluminum foil; drizzle with olive oil. Fold edges together to seal. Bake 30 - 40 minutes. (To see if it's done, squeeze the sides while holding a kitchen towel, The garlic should give easily and feel soft). Cool.

Squeeze cooked garlic into a medium bowl. Garlic will be soft and sticky. Add butter, salt and pepper, stirring to combine.Spread cut halves of bread evenly with garlic butter mixture. Broil 5 1/2 inches from heat, with oven door partially opened, for 2 to 3 minutes, or until butter melts and bread is toasted. Cut into slices to serve.

Searching for "My" Recipe for Lasagna

My older son recently turned 16, and I'm starting to envision a time where he no longer lives at home. He'll decide for himself how much time he'd like to spend with his Mom -- and since I love the kid, I'd like to see him choose to spend some time with me. I figure that one way of ensuring this is by having recipes that I make the best (at least in his eyes). A meal I continue to tinker with is one of his favorites -- lasagna and garlic bread.

I've made both fairly often and I usually cook them without a recipe. Because of this, they come out different every time, and very rarely a "wow.' The lasagna has a tendency to be dry and not flavorful enough, and the garlic bread ranges from not enough garlic to too much.

My most recent attempt at the meal was from Paula Deen -- not because I think she's the greatest Italian cooking, but because her recipe is along the lines of how I usually make these dishes. In her lasagna, she uses  a combination of ground beef and Italian sausage, which is what I usually do. I substituted 1/2 pound of turkey breast for ground beef in an attempt to lighten the dish a bit, which didn't do much to help the flavor or texture. She uses cottage cheese, which I changed to ricotta. She called for oven-ready noodles, but I use regular. The lasagna was good -- my son and husband ate quite a bit -- but wasn't exactly what I'd want my son to call "Mom's Lasagna."  The meat overwhelmed the dish and made it really heavy. It's a good starting point, though. Next time I'll try it with less of the meat and see how that goes.

Next post: Paula's DIVINE garlic bread.

Meaty Lasagna
Adapted from this Paula Deen recipe

1 pounds 90-95% lean ground beef
1/2 pound ground turkey (or you can use a total of 1 1/2 pounds ground beef)
1 pound ground Italian sausage
2 cloves garlic, minced
1 1/2 teaspoons Penzey's pizza spice (or you could use oregano)
1 teaspoon ground basil
1/4 teaspoon salt
1/4 teaspoon pepper
1 (14.5-ounce) can diced tomatoes with basil, garlic, and oregano
2 (15-ounce) cans tomato sauce
1 (6-ounce) can tomato paste
1 1/2 cups Ricotta cheese (Paula's uses small curd cottage cheese)
5 ounces grated Parmigianno-Reggiano
2 tablespoons freshly chopped parsley leaves
2 large eggs, lightly beaten
9 lasagna noodles, boiled to al dente
2 (8-ounce) packages shredded mozzarella

Preheat oven to 350 degrees F.

In a large saucepan, combine ground chuck, sausage onion and garlic. Cook over medium heat until meat is browned and crumbled; drain.

Return meat to pan and add oregano, basil, salt and pepper. Add tomatoes, tomato sauce and paste. Bring to a boil, reduce heat and simmer 30 to 45 minutes.

In a small bowl, combine Ricotta, Parmesan, parsley, and eggs.

Spoon 1/4 of sauce into bottom of a 13 by 9 by 2-inch baking pan. Place 3 uncooked lasagna noodles on top of sauce. Do not overlap noodles. Spread 1/3 of the Ricotta cheese mixture over noodles, top with 1/4 of sauce and 1/3 mozzarella cheese. Repeat layers, ending with sauce, reserving 1/3 of mozzarella cheese.

Bake 45 minutes. Top with remaining cheese and bake 15 minutes or until hot and bubbly. Let rest 10 minutes before serving.